


 101 / 114

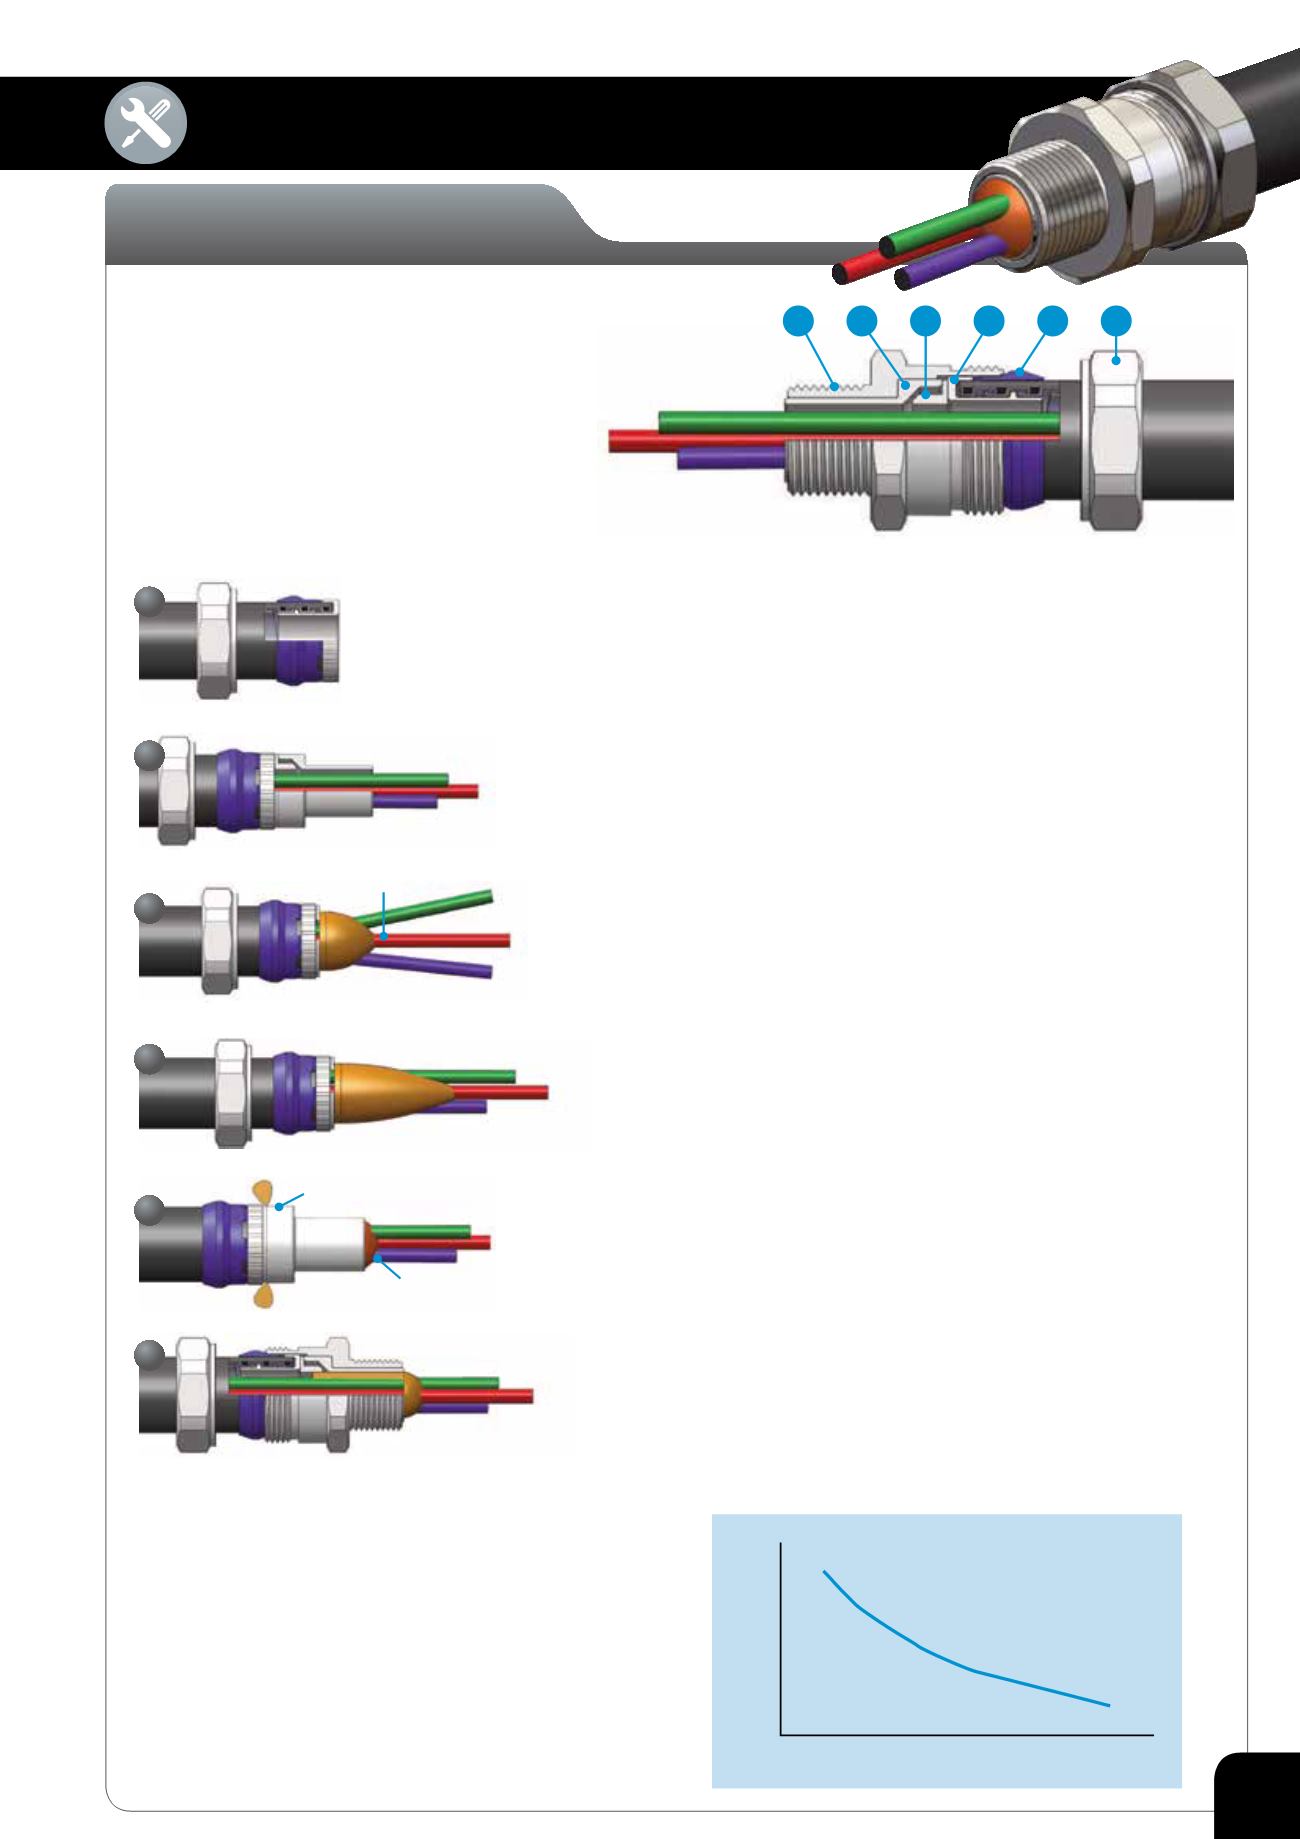
Conduit Gland Components
1.
Entry Thread
2.
Compound Tube
3.
Washer
4.
Conduit Insert
5.
Conduit Seal
6.
Compression Nut
1 2 3 4 5 6
NOTE:
For LTPB-EXD and LTP-EXD-90 & 45 installation instructions visit our website for further information.
Flexicon
EXD Conduit Gland
Installation Guide & Instructions
Please read all instructions carefully before beginning the installation
a
Disconnect the Compression Nut (6) and remove the Conduit Seal (5) and Conduit Insert
(4) from the gland. Slide the nut over the conduit, followed by the conduit seal (orientated
as shown below) and screw the conduit insert into place.
b
Remove the Compound Tube (2), and Washer (3) as an assembly from the Entry Item (1).
Feed the prepared cable/cable cores through the flexible conduit and through the
compound tube/washer assembly.
c
Remove the compound tube. If the installation involves a cable, remove any bedding or
fillers from around the cable cores. If the cable cores have screens, these should be
unravelled and then twisted together to form a single core. Wearing the protective gloves
supplied, mix all of the two-part epoxy compound (EP2122) until it is pliable and an even
colour is achieved. The minimum temperature when mixing is 10°C. Ensure compound is
within use-by date.
d
Separate the cable cores and apply the compound to the crutch of the cable for a distance
of about 6mm and pack into place. If a drain wire is present then it should be sleeved with
some heat shrink tubing which is pushed into the compound before shrinking with the
application of some heat. Screens that have been twisted together should be treated as a
drain wire.
e
Bring the cores together again and pack more compound around them to a length and
diameter sufficient to fill the compound tube, ending in a taper.
f
Pass the Compound Tube (2) over the conductors until the stepped end is fully located
with the Washer (3). Pack more compound into place until the compound tube is fully
filled.
g
Re-install the conduit assembly into the entry item making sure the compound is not
disturbed and loosely tighten the Compression Nut (6) onto the Entry Item (1). When the
compound has cured the entry item should be removed from the assembly and fitted to
the apparatus. The gland can then be refitted into it and the Compression Nut (6) finally
tightened. Typical cure times are shown opposite.
a
b
d
e
f
g
Crutch of the cable
Remove surplus compound
Ensure that compound
does not overlap tube
Installation instructions for Flexicon conduit gland
type EXD
Technical data and specification.
Installation Instructions
Installation should only be performed by a competent person using the
correct tools. Read all instructions before beginning installation.
Special Conditions For Safe Use
1
The conduit gland ranges shall only be used where the
temperature, at the point of entry, is in the following ranges:
-60°C to +85°C.
2
The entry component threads may need additional sealing to maintain
the ingress protection ratings as applicable to the associated equipment
to which it is attached.
1400
1200
1000
800
600
400
200
0
0
5
10 15 20 25 30 35 40 45
Temperature V’s Cure Times
Temperature (
º
c)
TIme (Mins)
101